DIY Anti-Aging Glowing Face Serum
DIY Anti-Aging Glowing Face Serum: A Natural Glow in a Bottle
DIY Anti-Aging Glowing Face Serum is one of my daily routines. I’ve come to realize that ageing is just part of life. It shows the stories we’ve lived and the memories we’ve made. And for me, the laughs I’ve had. But let’s be honest, most of us want skin that looks glowing, firm and healthy. But achieving that youthful glow doesn’t mean you have to spend hundreds on high-end skincare products. Many of the most effective ingredients are natural, affordable and easy to make at home.
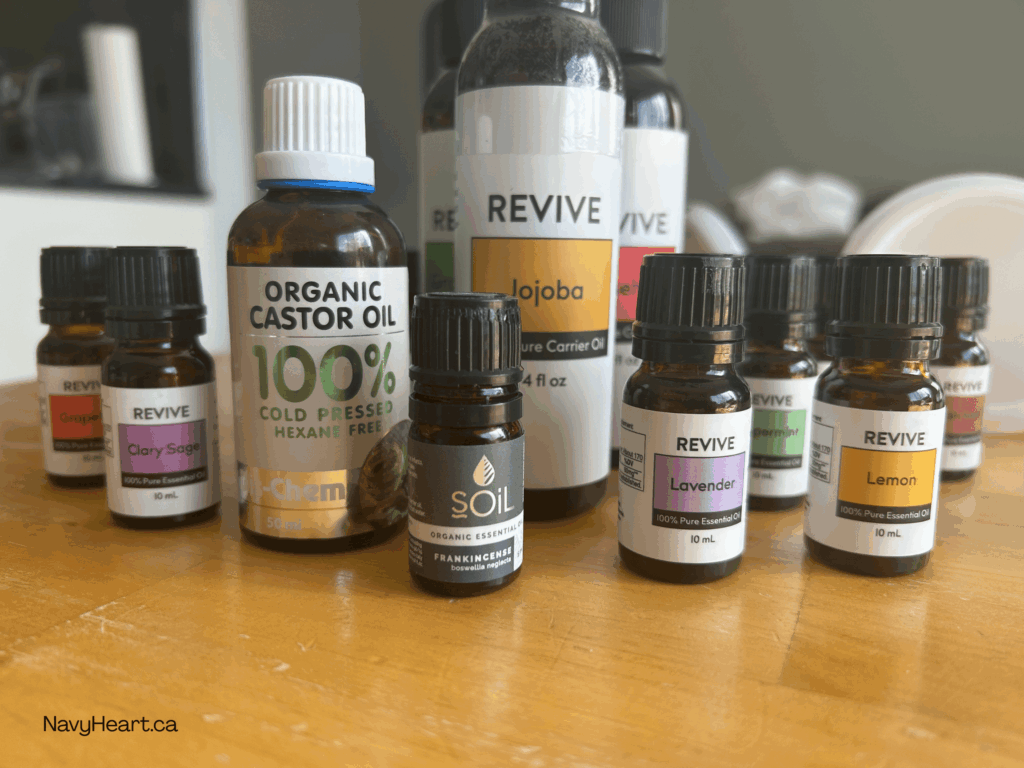
Here I will give you a super easy recipe to make your own DIY anti-aging face serum. using just a few pure ingredients: Jojoba oil, Castor oil, Frankincense and Lavender essential oil. This DIY Anti-Aging Glowing Face Serum easy to make. And it’s deeply nourishing, soothing and packed with skin-healing properties.

Let’s chat about our “Why?”
Why make your own face serum? Face serums are lightweight, fast-absorbing liquids that deliver concentrated active ingredients directly into the skin. While moisturizers hydrate the surface of your skin, serums work at a deeper level to help with:
- Fine lines and wrinkles
- Skin firmness and elasticity
- Uneven tone and texture
- Dryness and dullness
- Inflammation or sensitivity
When you make your own serum, you know exactly what you’re putting on your face. No fillers, preservatives or ingredients you can’t pronounce.
Before we dive into the how-to, let’s talk about why DIY is worth it.
- Natural Ingredients – No preservatives, artificial fragrances or harsh chemicals.
- Customizable – You can tweak it to suit your skin’s needs.
- Affordable – It costs much less than store-bought serums.
- Sustainable – You can reuse the same glass bottle every month.
Choosing the Right Ingredients. An effective anti-aging serum includes three key components, and if you look at these, you will see that you can make endless mixtures using different oils. Just make sure that you research the oils you want to use, to make sure they are going to be beneficial for your skin:
- Carrier Oils – These are the base of the serum and help moisturize and nourish the skin.
- Essential Oils – These highly concentrated plant extracts offer additional skin benefits.
- Optional Add-ins – Think vitamin E, rosehip oil, or hyaluronic acid for an extra boost.

DIY Anti-Aging Glowing Face Serum Ingredients and Their Anti-Aging Benefits,
Jojoba Oil ~ Jojoba oil is technically a liquid wax that closely mimics the skin’s natural sebum. That means it absorbs easily, doesn’t clog pores, and helps balance oily or dry skin.
- Deeply moisturizing
- Rich in vitamin E and antioxidants
- Helps reduce the appearance of fine lines
- Supports skin elasticity and softness
Castor Oil ~ Castor oil is a thicker oil known for its intense moisturizing and healing properties. It also has a unique fatty acid called ricinoleic acid that promotes skin regeneration.
- Fights dryness and improves texture
- Encourages collagen and elastin production
- Helps reduce pigmentation and age spots
- Anti-inflammatory and antibacterial
Frankincense Essential Oil ~ Used since ancient times, frankincense is a powerful anti-aging essential oil. It tones the skin and helps with cell turnover.
- Reduces wrinkles and fine lines
- Promotes healthy skin regeneration
- Tightens and firms the skin
- Soothes redness and inflammation
Lavender Essential Oil ~ Lavender is known for its calming scent, but it’s also wonderful for skin.
- Calms irritated skin and reduces redness
- Helps heal minor scars or blemishes
- Antioxidant-rich to combat free radicals
- Promotes a glowing, even complexion

How to Make Your DIY Anti-Aging Glowing Face Serum
What You’ll Need:
- 1 tablespoon jojoba oil (15ml)
- 1 tablespoon castor oil (15ml)
- 5 drops frankincense essential oil
- 5 drops lavender essential oil
- 1 small glass dropper bottle (30ml)
- Small funnel (optional)
- Label and pen (for dating your batch)
Instructions:
- Sanitize Your Bottle
Clean your dropper bottle with warm soapy water and let it air dry. If you want to go the extra mile, you can wipe it with a little rubbing alcohol to ensure it’s fully sterile. - Mix the Oils
Using your funnel, pour the jojoba oil and castor oil into the bottle. Add the drops of frankincense and lavender essential oil. - Shake It Up
Put the dropper top on and give the bottle a gentle shake to mix all the ingredients. - Label It
Write the date and name of your serum on a label. This helps you track freshness. Store it in a cool, dark place away from direct sunlight. ( You don’t necessarily need to label it, if you are like me and use it twice a day, this lasts approximately 3-4weeks in a 30ml bottle )
How to Use Your Anti-Aging Face Serum
Using your serum is simple, but consistency is key.
- Cleanse your face – Use your regular cleanser to wash away makeup, dirt and oil.
- Apply a toner (optional) – If you use a toner, apply it before the serum.
- Use the serum – Take 3–5 drops of the serum and gently massage it into your face and neck using upward strokes.
- Let it absorb – Wait a few minutes before applying moisturizer or makeup. You can also use it as a nighttime treatment.
I use my face serums both morning and night (because I am trying to catch up about 15 years of not making my skin a priority) but it is up to you when you want to use it, if possible use it at least once a day to get good results.

Boost Results with Microneedling ( Optional )
To take your serum’s effectiveness to the next level, consider pairing it with microneedling. This technique uses a dermaroller or microneedling pen with tiny, shallow needles to create micro-channels in the skin. These channels enhance the absorption of active ingredients, like the ones in your DIY Anti-Aging Glow Face Serum—by allowing them to penetrate deeper into the skin layers.
Microneedling also stimulates collagen production, helping to improve skin texture, firmness and the appearance of fine lines over time. For best results, use a 0.25 mm dermaroller 1–2 times per week on clean skin, then immediately apply your serum while the skin is still receptive. Always sanitize your roller before and after use ( I use 90% Isopropyl Alcohol), and avoid microneedling if you have active acne, eczema or open wounds.
*Please do research on microneedling if you are wanting to try this for the first time. You don’t want to damage your skin by rolling too hard or pulling the needles in different directions when they are in your skin. You want to gently insert the needle into the skin, you don’t want to tear or damage the skin.
Tips and Tricks
- Patch test first: Always test new products on a small area of skin to check for sensitivity, especially when using essential oils.
- Adjust for skin type: If you have oily or acne-prone skin, you can reduce the amount of castor oil or use a lighter carrier like rosehip oil instead.
- Make it your own: Add a drop of vitamin E for extra antioxidant properties or try a different essential oil like rosemary, neroli, geranium or helichrysum for more skin benefits. (Peppermint and Eucalyptus can be sensitive on your eyes so make sure you avoid your eye area if you choose to try those)
What should you Expect?
Natural skincare takes time, but the results are worth it. With regular use, you may notice:
- Smoother skin texture
- Reduced fine lines and wrinkles
- A more even, glowing complexion
- Less irritation or dry patches
Everyone’s skin is different, so pay attention to how your skin responds. You might even enjoy the relaxing ritual of applying your serum each night, it’s like a mini spa moment in your routine.
Creating your own DIY anti-aging serum isn’t just about skincare, it’s about self-care. Knowing exactly what’s in your products and being part of the process adds an extra layer of intention to your beauty routine. And the best part? It’s simple, effective and made with ingredients you can trust.
So why not give it a try? Your future glowing skin will thank you
Thank you for visiting my page! I hope you loved this recipe as much as I do!
As I am just starting this blog, I would be very appreciative if you look through my other recipes and share any ideas of what else you would like to see. My Focus is on Healthy Recipes, DIY Essential Oil Infused Self-Care and Natural Based Cleaning Products. This is one of my favourite recipes;
